How to Replace Toshiba Satellte P200 / P205 LCD Inverter & Video Cable

This disassembly instruction should work for Toshiba Satellite P200 / P205 / X200 / X205 series. If you find it doesn’t match up with your laptop, please inform me. In this case the real laptop is Toshiba Satellite P205 laptop.

1. Turn off your laptop. Please unplug the power adapter and remove the battery.

2. Using a sharp object, for example a small flat-head screwdriver, remove for rubber seals from the LCD bezel.

Toshiba P205 inverter

3. Remove four screws located under the rubber seals.

4. Start separating the LCD screen bezel from the LCD cover on the top of the panel.
Insert your fingers between the bezel and the LCD screen and carefully release the latches.

Toshiba P205 inverter

5. Continue removing the screen bezel working with your fingers. Finally, you’ll have to release the latches on the bottom of the bezel. This is the hardest part in this disassembly process because the bezel has a strange shape. Remove the screen bezel.

Toshiba P205 inverter

6. Now, you can see the screen inverter. In order to remove the screen inverter you’ll have to unplug cables on both sides of the inverter and remove one screw.

Toshiba P205 inverter

7. Remove six screws securing the laptop hinges to the LCD cover.

Toshiba P205 Video Cable

8. Separate the LCD cover from the LCD. Carefully push on the LCD cover as it shown on the picture.

Toshiba P205 Video Cable

9. Unplug the video cable from the back of the LCD screen.

Toshiba P205 Video Cable

10. Reverse the procdure to install your new Toshiba Satellite P200 / P205 screen video cable and assmeble your computer.

Notice: Toshiba Statellite P205 Video cable has two types, their connectors to the motherboard are different.So please verify it before you purchase the cable. You can refer to the detailed information on http://www.battery-adapter.com.

How to Replace Acer Extensa 5620 5220 Keyboard

1, Shut down your Acer Extensa 5620 / 5220. Disconnect the AC adapter and remove the battery.

2. Open the LCD screen all the way to facilitate the easy removal of the middle cover.

3. To remove the Middle Cover, carefully insert the plastic flat screwdriver under the side of the middle cover and gently pry up the middle cover. Continue prying on the other side until you could detach the Middle Cover.

acer 5620 keyboard

4. Detach the cover and turn it over on the keyboard.

acer 5620 keyboard

5. Disconnect the Power board cable from the main board and disconnect the Power board cable.

acer 5620 keyboard

6. Remove the Middle Cover together with the Power board.

acer 5620 keyboard

7. Remove the two screws (F) securing the Acer Extensa 5620 5220 keyboard to the upper case.

acer 5620 keyboard

8. Carefully pry the keyboard out of the latch and slide it out; then turn it over on the touchpad area.

acer 5620 keyboard

9. Disconnect the keyboard cable from the main board to remove the Acer Extensa 5620 5220 keyboard.

acer 5620 keyboard

10. Reverse the procedure to install your new Acer Extensa 5620 5220 Keyboard .oard.

Replace the Compaq Presario CQ61, HP G61 keyboard

This guide is for removing the keyboard on Compaq Presario CQ61 series and  HP G61 series.  You can find the replacement keyboard  through this webpage  Compaq Presario CQ61/HP G61 keyboard.

1. Shut down the Compaq Presario CQ61 / HP G61.  Disconnect all external devices connected to the computer.

2. Disconnect the power from the computer by first unplugging the power cord from the AC outlet and then unplugging the AC adapter from the computer. Remove the battery.

3. Turn the Compaq Presario CQ61 / HP G61 upside down, with the front toward you.

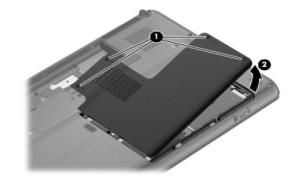
4. Remove the hard drive cover.  Loosen the 4 Phillips PM2.5×6.0 captive screws 1 that secure the hard drive cover to the computer. Lift the right side of the hard drive cover 2, swing it up and to the left, and remove the cover. The hard drive cover is included in the Plastics Kit, spare part number 531517-001.

Compaq Presario CQ61 / HP G61 keyboard

5. Remove the hard wireless module cover. Loosen the Phillips PM2.5×6.0 captive screw 1 that secures the wireless compartment cover to the computer. Lift the right side of the cover 2, swing it to the left, and lift up to remove it 3. The wireless compartment cover is included in the Plastics Kit, spare part number 531517-001.

Compaq Presario CQ61 / HP G61 keyboard

6. Remove the 5 Phillips PM2.5×7.0 screws that secure the keyboard to the Compaq Presario CQ61 / HP G61 .

Compaq Presario CQ61 / HP G61 keyboard

7.  Turn the Compaq Presario CQ61 / HP G61 right-side up, with the front toward you.

8. Open the computer as far as possible. Release the tabs along the left 1 and right 2 edges of the Compaq Presario CQ61 / HP G61 keyboard using a thin flat-bladed screwdriver.  Lift the rear edge of the keyboard 3, and rotate it forward until it rests upside down on the TouchPad.

Compaq Presario CQ61 / HP G61 keyboard

9. Release the zero insertion force (ZIF) connector 1 to which the keyboard cable is attached, and then disconnect the keyboard cable 2 from the system board.

Compaq Presario CQ61 / HP G61 keyboard

8. Remove the Compaq Presario CQ61 / HP G61 keyboard. Reverse this procedure to install the keyboard.

How to replace Toshiba Satellite A200/M200/M300/L300 keyboard

This maintenance guide applies to Toshiba Satellite A200 keyboard, Satellite M200 keyboard, Satellite M300 keyboard, Satellite L300 series keyboard. More detailed models, please refer to this webpage: http://battery-adapter.com/product_info.php/products_id/3977

1. Disconnect all the external device and the power adapter, remove the battery.

2. Turn the Toshiba Satellite L300 upside down

3. Loose the screw securing KBD Holder. M2.0x1.8B Flat BIND screws x3

Toshiba L300 Keyboard

satellite L300 keyboard

4. Upside down the Toshiba Satellite L300 keyboard.

5. Remove KBD holder. Remove the KB holder screw: M2.5 x 3B x1

Toshiba L300 Keyboard-1

Toshiba Satellite L300 keyboard

6. Insert your finger into the keyboard slot and keyboard. Then lift up the keyboard to remove it.

Toshiba L300 Keyboard-2

Toshiba Satellite L300 keyboard

7. Disconnect keyboard cable.

8. Reverse the procedure to install the new Toshiba Satellite L300 keyboard.

How to replace Toshiba Satellite A300 keyboard

This maintenance guide applies to Toshiba Satellite A300 keyboard, Satellite A305 keyboard, Satellite A350 keyboard, Satellite A355 keyboard. More detailed models, please refer to this webpage: http://battery-adapter.com/product_info.php/products_id/3465

1. Disconnect all the external device and the power adapter, remove the battery.

2. Turn the Toshiba Satellite A300 upside down

3. Loose the screw securing KBD Holder. M2.0x1.8B Flat BIND screws x3

Toshiba L300 Keyboard
satellite A300 keyboard

4. Upside down the Toshiba Satellite A300 keyboard.

5. Remove KBD holder. Remove the KB holder screw: M2.5 x 3B x1

Toshiba L300 Keyboard-1
Toshiba Satellite A300 keyboard

6. Insert your finger into the keyboard slot and keyboard. Then lift up the keyboard to remove it.

Toshiba L300 Keyboard-2
Toshiba Satellite A300 keyboard

7. Disconnect keyboard cable.

8. Reverse the procedure to install the new Toshiba Satellite A300 keyboard.

How to replace the HP Pavilion ZV5000, ZX5000, ZV6000 LCD inverter and hinges


This guides applies to the laptop HP Pavilion ZV5000, HP Pavilion ZX5000, HP Pavilion ZV6000.  When you prepare the replacement for HP Pavilion ZV5000 / ZX5000/ ZV6000  hinges, you need to pay attention to the size of your laptop screen, is it 15.4″ or 15.0″? You can refer to two different hinges on battery-adapter.com.

Pavilion ZV5000 15.4" LCD Hinges

Pavilion ZV5000 15.4" Hinges

Pavilion ZV5000 Hinges

Pavilion ZV5000 15.0" Hinges

1. Remove battery and power supply from the laptop.

2. There are six rubber screw covers on the LCD screen bezel. You’ll have to remove all covers. You can remove covers with a sharp object. Remove six screws found under the rubber covers.

3. Take off the strip cover above the keyboard. Youcan find the detailed guide in my another post named How to Replace HP Pavilion ZV5000, ZX5000 Keyboard.  Removed the screws securing the display hinges/brackets to the computer.

4. Separate the screen bezel and display cover. Be careful, the bezel made of fragile plastic. Remove the screen bezel .

HP ZV5000

HP Pavilion ZV5000

5. Now you can get an access to the screen inverter which is mounted below the screen. Remove one screw securing the inverter board.

HP ZV5000

HP Pavilion ZV5000

Disconnect cables on both sides of the inverter board. The inverter board has been removed. If you also need to replace the  inverter, it is the time. HP Pavilion ZV5000, ZX5000, ZV6000 inverter also has two types, one is for 15.4″ LCD and the other one is for 15″ LCD.  You can find them on battery-adapter.com.

15.4" HP ZV5000 inverter

15.4" HP ZV5000 inverter

15" HP ZV5000 inverter

15" HP ZV5000 inverter

6. Remove two screws securing each display hinge/bracket.  Now you can get an access to the back side of the LCD screen. Remove clear tape covering the connector and disconnect the screen cable from the LCD screen. Simply unplug the cable from the connector.

7. Remove two screws from each side of the screen. These screws securing the display hinges/brackets to the screen.

8. Now, you can install your new HP Pavilion ZV5000 / ZX5000/ ZV6000 LCD hinges

How to replace the HP Pavilion zx5000, ZV5000 keyboard

This guide applies to HP Pavilion zx5000 series, HP Pavilion zv5000 series, Compaq Presario R3000 series, HP Compaq nx9100 series. Buy a replacement keyboard, you can go to HP Pavilion ZV5000 keyboard store.

1. Shut down the Pavilion ZX5000/ZV5000. Disconnect all external devices connected to the notebook and  the power cord. And remove  the battery.

2. Turn the notebook upside down with the rear panel towardyou.

3. Remove the 3 PM2.5×13.0 screws that secure the strip cover to the notebook.

ZV5000

✎2 of the screws that secure the strip cover to the notebook also secure the thermal cover. It is not necessary to remove the thermal cover to remove the strip cover.

4. Turn the Pavilion ZX5000/ZV5000 right-side up with the front toward you.

5. Open the Pavilion ZX5000/ZV5000 display as far as possible.

6. Using a flat-bladed screwdriver, lift the right side 1 of the strip cover to disengage the cover 2 from the notebook.

7. Lift the middle of the strip cover 3 and swing it toward you to remove it from the notebook.

ZV5000-1

8. Remove the 4 PM2.5×3.0 screws 1 that secure the keyboard to the ZX5000/ZV5000.

9 Lift the rear edge of the ZX5000/ZV5000 keyboard up 2 and swing it toward you until it rests on the palm rest.

10. Disconnect the ZIF connector 3 to which the keyboard cable is attached and disconnect the keyboard cable 4.

ZV5000-2

11. Reverse the above procedure to install the new Pavilion ZX5000/ZV5000 keyboard.

How to Disassemble the HP Pavilion DV9000 Display

Based on this guide, you will know how to replace the Pavilion 9000 hinges, Pavilion DV9000  inverter, webcam, video cable etc. And this guide also applies to Pavilion DV9200, Pavilion DV9300, Pavilion DV9500, Pavilion DV9600 and other models. If you want to know more compatible models or purchase some parts such as hinges, inverter, you can visist the website battery-adapter.com.

1. Shut down your Pavilion DV9000. Disconnect all external devices and the power cord. And remove the battery.

2. Remove the memory module compartment cover.

  • Loosen the two captive Phillips PM2.0×5.0 screws 1 that secure the memory module compartment cover to the computer.
  • Lift the front of the memory module compartment cover 2, and then swing it back.
Pavilion DV9000-D1

Removing the Memory Module Compartment Cover

3. Remove the switch cover and keyboard. If you don’t know how to do it, you can refer to my another blog How to Replace the HP Pavilion 9000 Keyboard.

4. Close the computer and turn the computer upside down with the rear panel toward you.

5. Remove the two Phillips PM2.5×8.0 screws that secure the display assembly to the computer.

Pavilion DV9000-D2

Removing the Display Assembly Screws

6. Turn the computer display-side up with the front toward you. Open the computer to an upright position.

7. Disconnect the speaker assembly cable 1 from the power button board.

8. Remove the the wireless antenna cables and microphone cable from the clips 2 in the speaker assembly.

Pavilion DV9000-D1-1

Removing the Speaker Assembly

9. Remove the two black Phillips PM2.5×5.0 screws 1 that secure the speaker assembly to the computer. Remove the speaker assembly 2.

Pavilion DV9000-D1-2

Removing the Speaker Assembly

10. Disconnect the display cable 1 from the system board and the microphone cable 2 from the power button board.
11. Remove the wireless antenna cables and the camera cable from the clips 3 in the top cover.
12. Disconnect the camera cable 4 from the system board.

Pavilion DV9000-D3

Disconnecting the Display Cables

13. Remove the two Phillips PM2.5×8.0 screws 1 and the two silver Phillips PM2.5×5.0 screws 2 that secure the display assembly to the computer. Then remove the display assembly 3.

Pavilion DV9000-D4

Removing the Display Assembly

CAUTION: Support the display assembly when removing the following screws. Failure to support the display assembly can result in damage to the display assembly and other computer components.

14. Remove the following:

  • Three rubber screw covers on the display bezel top edge, they are included in the Display Screw Kit, spare part number 432967-001.
  • Two rubber screw covers on the display bezel bottom edge
  • Five Phillips PM2.5×8.0 screws
Pavilion DV9000-D5

Removing the Display Bezel Screws

15. Flex the inside edges of the left and right sides and the top and bottom sides of the display bezel until the bezel disengages from the display enclosure. Afterwards remove the display bezel.

Pavilion DV9000-D6

Removing the Display Bezel

16. Remove the camera module 1 from the display enclosure. The camera module is secured to the display enclosure by a2-sided adhesive pad. Apply removal force to the middle of the module to remove it. Disconnect the camera cable 2 from the camera module.

Pavilion DV9000-D7

Removing the Camera Module

When you purchase a Pavilion DV9000 inverter, you need to verify the display owns dual or single lamp screen, they have different inveters. You can refer to their photos on battery-adapter.com.

17. Remove the inverter 1 from the display enclosure. Disconnect the display cable 2 and the backlight cable 3 from the display inverter.Removing the HP Pavilion DV9000 Display Inverter.

Pavilion DV9000-D8

Removing the Pavilion DV9000 Display Inverter

18. Remove the six Phillips PM2.5×8.0 screws 1 that secure the display panel to the display enclosure. Remove the display panel 2.

Pavilion DV9000-D9-1

Removing the Display Panel

19. Remove the two Phillips PM2.0×3.0 screws 1 that secure each display hinge to the display enclosure. Remove the HP pavilion DV9000 display hinges 2. Slide the left and right display hinge covers 3 off of the display hinges.

Pavilion DV9000-D9

Removing the Display Hinges

20. If it is necessary to replace the wireless antenna transceivers and cables, remove the two Phillips PM2.0×4.0 screws 1 that secure each transceiver to the display enclosure. Remove the wireless antenna cables from the clips 2 built into the display enclosure. Detach the wireless antenna transceivers 3 from thedisplay enclosure. Remove the wireless antenna cables 4.Removing the Wireless Antenna Transceivers and Cables

Pavilion DV9000-D10

Removing the Wireless Antenna Transceivers and Cables

21. If it is necessary to replace the microphones and cables,release the retention tabs 1 built into the display enclosurethat secure the microphone cables to the display enclosure. Remove the microphone receivers 2 from the clips in thedisplay enclosure. Remove the microphone cables 3 from the display enclosure.Removing the Microphones

Pavilion DV9000-D11

Removing the Microphones

22. If it is necessary to replace the camera cable, release the retention tabs 1 built into the display enclosure that secure the camera cable to the display enclosure. Remove the camera cable 2 from the display enclosure. Removing the Pavilion DV9000 Camera CableRemoving the Camera Cable.

Pavilion DV9000-D12

Removing the Camera Cable

Reverse the above procedure to reassemble and install the Pavilion DV9000 display assembly.
How to replace the HP Pavilion DV9000 keyboard

Keyboars of   HP Pavilion DV9000, DV9200, DV9300, DV9500, DV9600 etc are the them, I suppose this guide should apply to these models. You can find a replacement by click HP Pavilion DV9000 keyboard.

1. Shut down the HP Pavilion DV9000.

2. Disconnect the power cord and all external devices connected to the computer. Then remove the battery.

3. Turn the HP Pavilion DV9000 upside down with the front panel toward you.
4. Remove the six Phillips PM2.0×5.0 screws that secure the switch cover to the computer.

Pavilion DV9000

5. Turn the HP Pavilion DV9000 display-side up with the front toward you.

6. Open the computer as far as possible.

7. Lift the rear edge of the switch cover and swing it forward until it rests on the keyboard.
Pavilion DV9000-2

8. Release the zero insertion force (ZIF) connector 1 to which the LED board cable is connected and disconnect the cable 2 from the LED board.
Pavilion DV9000-3

9. Remove the switch cover.

10.  Close the HP Pavilion DV9000 and turn it upside down. Remove the Phillips PM2.5×7.0 screw that secures the keyboard to the computer.

Pavilion DV9000-4

11. Turn the HP Pavilion DV9000 display-side up with the front panel toward you.

12. Open the computer as far as possible.

13. Remove the three silver Phillips PM2.5×5.0 screws that secure the keyboard to the computer.
Pavilion DV9000-5

14. Lift the rear edge of the keyboard 1 until it rests at an angle.

15. Slide the keyboard 2 back to disengage the tabs on the front edge of the HP Pavilion DV9000 keyboard from the top cover.

16. Swing the keyboard 3 forward until it rests on the palm rest.

Pavilion DV9000-6

17. Release the ZIF connector 1 to which the keyboard cable is connected and disconnect the keyboard cable 2 from the system board.
Pavilion DV9000-7

18. Remove the HP Pavilion DV9000 keyboard.
Reverse the above procedure to install the new HP Pavilion DV9000 keyboard.

How to replace a keyboard of HP Pavilion DV6000 / DV6500 /DV6700

The guide applies to Pavilion DV6000 series, Pavilion DV6100 series,  Pavilion DV6200 series, Pavilion DV6300 series, Pavilion DV6400 series, Pavilion DV6500 series, Pavilion DV6600 series, Pavilion DV6700 series, Pavilion DV6800 series, Pavilion DV6900 series. You can find the replacement for HP Pavilion DV6000 keyboard here.

How to replace HP Pavilion DV6000 keyboard

Replacing a keyboard of the HP Pavilion DV6000 notebook computer is  more difficulty than other laptops. The screws that secure the keyboard are removed from the computer base, which prolongs the procedure because you have to flip the computer back and forth. Once you’ve gotten the screws out, the removal is simply done and you can either replace it if it’s broken or work on any components beneath the keyboard.

Things You’ll Need:

  • Phillips-head screwdriver
  • Flat-head screwdriver
  • A new keyboard, you can find it on the website battery-adapter.com.

1. Shut down the computer.

2. Disconnect the power cable from the computer.

3. Disconnect all the cables and external devices from their ports on the computer.

4. Turn the computer over so you are looking at the bottom. Locate the battery on the hinge side of the base.

5. Slide the battery release latch and remove the battery from the bay.

6. Locate the square-shaped memory module compartment in the middle of the base and remove the two screws from the cover.

7. Remove the memory module compartment cover.

HP Pavialion DV6000 keyboard

HP Pavialion DV6000 keyboard

8. Extract the five screws from inside the battery bay.

9. Remove the screw from the top-left corner of the memory module compartment and the screw just outside the top-right corner of the compartment.

HP Pavialion DV6000 keyboard

HP Pavialion DV6000 keyboard

10. Turn the computer top-side-up and open the display as far as it can open.

11. Lift the top of the switch cover–the plastic strip that runs between the keyboard and the display–and flip it over the keyboard. A ribbon cable connects the switch cover to the computer.

HP Pavialion DV6000 keyboard

HP Pavialion DV6000 keyboard

12. Disconnect the ribbon cable and remove the switch cover.

13. Lift the top of the keyboard and slide the keyboard toward the display to disengage the tabs under the bottom row of keys that secure it in place.

14. Disconnect the ribbon cable Remove the keyboard from the computer.

HP Pavialion DV6000 keyboard

HP Pavialion DV6000 keyboard

15. Follow the instructions in reverse order to replace the keyboard.